Android一代壳详解

Android一代壳详解

一代壳指的是Dex整体替换,二代壳是函数抽取,下篇文章再研究二代壳

ClassLoader

类的生命周期如下

image-20220611091531481

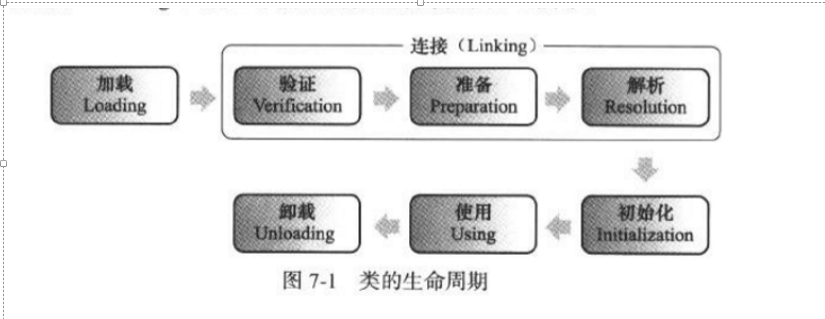
类的数据是存储在class/Dex文件中的,Java虚拟机要想使用这些类,就得先用类加载器把类从文件中加载出来,初始化成内存中的元数据,当然这里类的class来源不限于文件,只要是满足class/Dex文件定义的数据流即可(动态生成)

每个类加载器ClassLoader是有自己的空间的,两个ClassLoader如果不存在父子关系,那么其加载的class相互不可见

每个ClassLoader只能有一个父类,Java虚拟机,包括Dalvik和Art采用的都是双亲委托机制:概括起来就是自底向上检查类是否已经加载,然后自顶向下尝试加载类。

Android里面的类加载器叫DexClassLoader

资源问题

一代壳的整体加壳方案有两种

  • 壳Apk动态加载源Apk,完成Dex的替换,这种方式动态加载源Dex之后,就会存在一个资源问题,因为此时源Dex用的是壳Apk的资源,需要进行资源替换,这种方案基本不用修改源apk什么东西,直接套上去就行
  • 用壳Dex去替换源Dex,资源仍用源Apk,这样就可以避免资源替换的问题

不管用哪种方案,这里都介绍一下Android的资源问题

Android资源文件分为两类,第一类是res目录下的可编译资源文件,编译时,系统会自动在R.java中生成资源文件的十六进制值,

例如我在strings.xml中定义了一个字符串

1
2
3
4
<resources>
<string name="app_name">testShell</string>
<string name="secondText">Im second Text</string>
</resources>

image-20220612114710069

当我们想使用这种类型的资源时

1
2
3
4
5
6
7
8
9
protected void onCreate(Bundle savedInstanceState) {
super.onCreate(savedInstanceState);
setContentView(R.layout.activity_second);
Resources resources = getResources();
String str = resources.getString(R.string.secondText);
Log.d(TAG, "onCreate: " + str);
textView = (TextView) findViewById(R.id.textView);
textView.setText(R.string.secondText);
}

可以用Resources去getResources,为什么setText可以直接用资源id当参数,是因为其有这个重载函数

1
2
3
public final void setText(int resid) {
throw new RuntimeException("Stub!");
}

一代壳加壳原理

App启动流程

参考这篇文章

[原创]FART:ART环境下基于主动调用的自动化脱壳方案-Android安全-看雪论坛-安全社区|安全招聘|bbs.pediy.com

image-20220611110603430

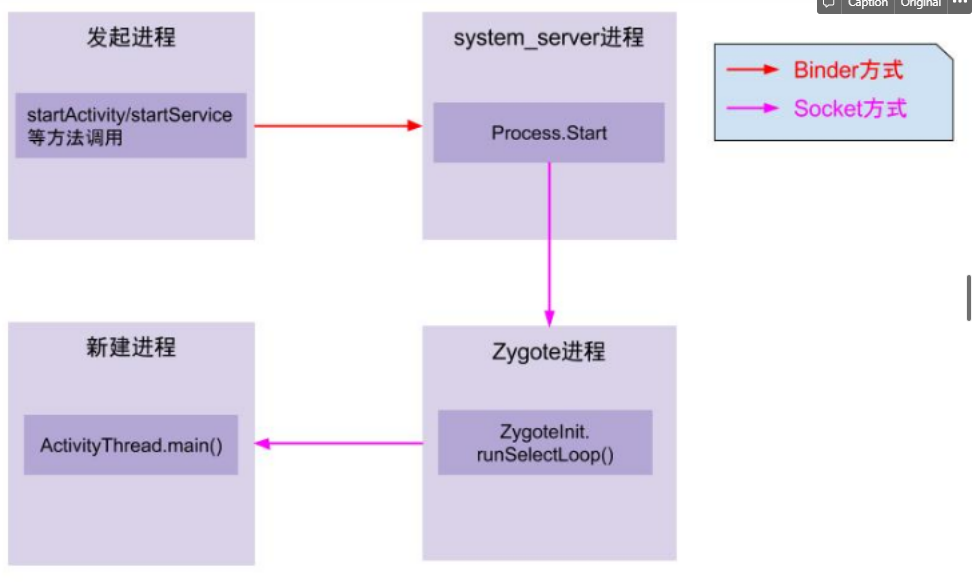
ActivityThread.main是进入APP世界的大门,ActivityThread是单例模式,静态函数currentActivityThread用于获取当前单例

1
2
3
1941      public static ActivityThread currentActivityThread() {
1942 return sCurrentActivityThread;
1943 }

Activity.main

1
2
3
4
5
6
7
8
9
10
11
12
13
14
15
16
17
18
19
20
21
22
23
24
25
26
27
28
29
30
31
32
33
34
35
36
37
38
39
40
41
42
43
5379    public static void main(String[] args) {
5380 Trace.traceBegin(Trace.TRACE_TAG_ACTIVITY_MANAGER, "ActivityThreadMain");
5381 SamplingProfilerIntegration.start();
5382
5383 // CloseGuard defaults to true and can be quite spammy. We
5384 // disable it here, but selectively enable it later (via
5385 // StrictMode) on debug builds, but using DropBox, not logs.
5386 CloseGuard.setEnabled(false);
5387
5388 Environment.initForCurrentUser();
5389
5390 // Set the reporter for event logging in libcore
5391 EventLogger.setReporter(new EventLoggingReporter());
5392
5393 AndroidKeyStoreProvider.install();
5394
5395 // Make sure TrustedCertificateStore looks in the right place for CA certificates
5396 final File configDir = Environment.getUserConfigDirectory(UserHandle.myUserId());
5397 TrustedCertificateStore.setDefaultUserDirectory(configDir);
5398
5399 Process.setArgV0("<pre-initialized>");
5400
5401 Looper.prepareMainLooper();
5402
5403 ActivityThread thread = new ActivityThread();
5404 thread.attach(false);
5405
5406 if (sMainThreadHandler == null) {
5407 sMainThreadHandler = thread.getHandler();
5408 }
5409
5410 if (false) {
5411 Looper.myLooper().setMessageLogging(new
5412 LogPrinter(Log.DEBUG, "ActivityThread"));
5413 }
5414
5415 // End of event ActivityThreadMain.
5416 Trace.traceEnd(Trace.TRACE_TAG_ACTIVITY_MANAGER);
5417 Looper.loop();
5418
5419 throw new RuntimeException("Main thread loop unexpectedly exited");
5420 }
5421}

这个函数主要是启动主消息循环,并创建Activity实例,Looper.loop()开始进入消息循环,等待接收来自系统的消息,当收到系统发送来的bindapplication的进程间调用时,用handlebindapplication来处理请求

1
2
3
4
5
6
7
8
9
10
11
12
13
14
15
16
17
18
19
20
private void handleBindApplication(AppBindData data) {
//step 1: 创建LoadedApk对象
data.info = getPackageInfoNoCheck(data.appInfo, data.compatInfo);
...
//step 2: 创建ContextImpl对象;
final ContextImpl appContext = ContextImpl.createAppContext(this, data.info);

//step 3: 创建Instrumentation
mInstrumentation = new Instrumentation();

//step 4: 创建Application对象;在makeApplication函数中调用了newApplication,在该函数中又调用了app.attach(context),在attach函数中调用了Application.attachBaseContext函数
Application app = data.info.makeApplication(data.restrictedBackupMode, null);
mInitialApplication = app;

//step 5: 安装providers
List<ProviderInfo> providers = data.providers;
installContentProviders(app, providers);

//step 6: 执行Application.Create回调
mInstrumentation.callApplicationOnCreate(app);

在 handleBindApplication函数中第一次进入了app的代码世界,该函数功能是启动一个application,并把系统收集的apk组件等相关信息绑定到application里,在创建完application对象后,接着调用了application的attachBaseContext方法,之后调用了application的onCreate函数。由此可以发现,app的Application类中的attachBaseContext和onCreate这两个函数是最先获取执行权进行代码执行的。这也是为什么各家的加固工具的主要逻辑都是通过替换app入口Application,并自实现这两个函数,在这两个函数中进行代码的脱壳以及执行权交付的原因。

LoadedApk 中的这个mBaseClassLoader是负责加载四大组建的ClassLoader

1
2
3
4
5
6
7
8
9
10
11
12
13
14
15
16
17
90  public final class LoadedApk {
91 static final String TAG = "LoadedApk";
92 static final boolean DEBUG = false;
93
94 private final ActivityThread mActivityThread;
95 final String mPackageName;
96 private ApplicationInfo mApplicationInfo;
97 private String mAppDir;
98 private String mResDir;
99 private String[] mOverlayDirs;
100 private String[] mSharedLibraries;
101 private String mDataDir;
102 private String mLibDir;
103 private File mDataDirFile;
104 private File mDeviceProtectedDataDirFile;
105 private File mCredentialProtectedDataDirFile;
106 private final ClassLoader mBaseClassLoader;

从上面追踪LoadedApk的创建过程

1
2
3
4
2093      public final LoadedApk getPackageInfoNoCheck(ApplicationInfo ai,
2094 CompatibilityInfo compatInfo) {
2095 return getPackageInfo(ai, compatInfo, null, false, true, false);
2096 }
1
2
3
4
5
6
7
8
9
10
11
12
13
14
15
16
17
18
19
20
21
22
23
24
25
26
27
28
29
30
31
32
33
34
35
36
37
38
39
40
41
42
43
44
45
46
47
48
49
2110      private LoadedApk getPackageInfo(ApplicationInfo aInfo, CompatibilityInfo compatInfo,
2111 ClassLoader baseLoader, boolean securityViolation, boolean includeCode,
2112 boolean registerPackage) {
2113 final boolean differentUser = (UserHandle.myUserId() != UserHandle.getUserId(aInfo.uid));
2114 synchronized (mResourcesManager) {
2115 WeakReference<LoadedApk> ref;
2116 if (differentUser) {
2117 // Caching not supported across users
2118 ref = null;
2119 } else if (includeCode) {
2120 ref = mPackages.get(aInfo.packageName);
//传入的includeCode是False,走的是这个false
2121 } else {
2122 ref = mResourcePackages.get(aInfo.packageName);
2123 }
2124
//这里一开始ref ==null,所以会走下面new LoadedApk
2125 LoadedApk packageInfo = ref != null ? ref.get() : null;
2126 if (packageInfo == null || (packageInfo.mResources != null
2127 && !packageInfo.mResources.getAssets().isUpToDate())) {
2128 if (localLOGV) Slog.v(TAG, (includeCode ? "Loading code package "
2129 : "Loading resource-only package ") + aInfo.packageName
2130 + " (in " + (mBoundApplication != null
2131 ? mBoundApplication.processName : null)
2132 + ")");
2133 packageInfo =
2134 new LoadedApk(this, aInfo, compatInfo, baseLoader,
2135 securityViolation, includeCode &&
2136 (aInfo.flags&ApplicationInfo.FLAG_HAS_CODE) != 0, registerPackage);
2137
2138 if (mSystemThread && "android".equals(aInfo.packageName)) {
2139 packageInfo.installSystemApplicationInfo(aInfo,
2140 getSystemContext().mPackageInfo.getClassLoader());
2141 }
2142
2143 if (differentUser) {
2144 // Caching not supported across users
2145 } else if (includeCode) {
2146 mPackages.put(aInfo.packageName,
2147 new WeakReference<LoadedApk>(packageInfo));
2148 } else {
//把创建的LoadedApk加入mResourcePackages
2149 mResourcePackages.put(aInfo.packageName,
2150 new WeakReference<LoadedApk>(packageInfo));
2151 }
2152 }
2153 return packageInfo;
2154 }
2155 }

mResourcePackage是ActivityThread的成员,这里是根据PackageName获取LoadedApk

1
279      final ArrayMap<String, WeakReference<LoadedApk>> mResourcePackages = new ArrayMap<>();

new LoadedApk,这里有个问题,传入的BaseLoader始终为null

1
2
3
4
5
6
7
8
9
10
11
12
141      public LoadedApk(ActivityThread activityThread, ApplicationInfo aInfo,
142 CompatibilityInfo compatInfo, ClassLoader baseLoader,
143 boolean securityViolation, boolean includeCode, boolean registerPackage) {
144
145 mActivityThread = activityThread;
146 setApplicationInfo(aInfo);
147 mPackageName = aInfo.packageName;
148 mBaseClassLoader = baseLoader;
149 mSecurityViolation = securityViolation;
150 mIncludeCode = includeCode;
151 mRegisterPackage = registerPackage;
152 mDisplayAdjustments.setCompatibilityInfo(compatInfo);

继续跟踪创建mApplication的地方

1
2
3
4
5
6
7
8
9
10
11
12
13
14
15
16
17
18
19
20
21
22
23
24
25
26
27
28
29
30
31
32
33
34
35
36
37
38
39
40
41
42
43
44
45
46
47
48
49
50
51
52
53
54
55
56
57
58
59
60
61
62
63
64
65
66
67
68
69
70
71
941      public Application makeApplication(boolean forceDefaultAppClass,
942 Instrumentation instrumentation) {
943 if (mApplication != null) {
944 return mApplication;
945 }
946
947 Trace.traceBegin(Trace.TRACE_TAG_ACTIVITY_MANAGER, "makeApplication");
948
949 Application app = null;
950
//这里获取app的className
951 String appClass = mApplicationInfo.className;
952 if (forceDefaultAppClass || (appClass == null)) {
953 appClass = "android.app.Application";
954 }
955
956 try {
//这里获取Classloader
957 java.lang.ClassLoader cl = getClassLoader();
958 if (!mPackageName.equals("android")) {
959 Trace.traceBegin(Trace.TRACE_TAG_ACTIVITY_MANAGER,
960 "initializeJavaContextClassLoader");
961 initializeJavaContextClassLoader();
962 Trace.traceEnd(Trace.TRACE_TAG_ACTIVITY_MANAGER);
963 }
//调用newApplication新建一个Application
964 ContextImpl appContext = ContextImpl.createAppContext(mActivityThread, this);
965 app = mActivityThread.mInstrumentation.newApplication(
966 cl, appClass, appContext);
967 appContext.setOuterContext(app);
968 } catch (Exception e) {
969 if (!mActivityThread.mInstrumentation.onException(app, e)) {
970 Trace.traceEnd(Trace.TRACE_TAG_ACTIVITY_MANAGER);
971 throw new RuntimeException(
972 "Unable to instantiate application " + appClass
973 + ": " + e.toString(), e);
974 }
975 }
976 mActivityThread.mAllApplications.add(app);
977 mApplication = app;
978
979 if (instrumentation != null) {
980 try {
//这里调用了Application的OnCreate
981 instrumentation.callApplicationOnCreate(app);
982 } catch (Exception e) {
983 if (!instrumentation.onException(app, e)) {
984 Trace.traceEnd(Trace.TRACE_TAG_ACTIVITY_MANAGER);
985 throw new RuntimeException(
986 "Unable to create application " + app.getClass().getName()
987 + ": " + e.toString(), e);
988 }
989 }
990 }
991
992 // Rewrite the R 'constants' for all library apks.
993 SparseArray<String> packageIdentifiers = getAssets().getAssignedPackageIdentifiers();
994 final int N = packageIdentifiers.size();
995 for (int i = 0; i < N; i++) {
996 final int id = packageIdentifiers.keyAt(i);
997 if (id == 0x01 || id == 0x7f) {
998 continue;
999 }
1000
1001 rewriteRValues(getClassLoader(), packageIdentifiers.valueAt(i), id);
1002 }
1003
1004 Trace.traceEnd(Trace.TRACE_TAG_ACTIVITY_MANAGER);
1005
1006 return app;
1007 }

newApplication,这里可以看到用传进来的ClassLoader 进行了loadClass

1
2
3
4
5
6
7
8
9
10
11
12
13
14
15
1083      public Application newApplication(ClassLoader cl, String className, Context context)
1084 throws InstantiationException, IllegalAccessException,
1085 ClassNotFoundException {
1086 return newApplication(cl.loadClass(className), context);
1087 }


1098 static public Application newApplication(Class<?> clazz, Context context)
1099 throws InstantiationException, IllegalAccessException,
1100 ClassNotFoundException {
1101 Application app = (Application)clazz.newInstance();
//这里调用attach
1102 app.attach(context);
1103 return app;
1104 }

再追踪一下classLoader的获取,这里是获取classLoader的地方,其会进一步调用createOrUpdateClassLoaderLocked 去创建classloader,这里会处理classloader的路径,就不继续跟了,反正到时候我们直接用这个classLoader肯定没错

1
2
3
4
5
6
7
8
706      public ClassLoader getClassLoader() {
707 synchronized (this) {
708 if (mClassLoader == null) {
709 createOrUpdateClassLoaderLocked(null /*addedPaths*/);
710 }
711 return mClassLoader;
712 }
713 }

总结来说,Application的attachBaseContext和OnCreate是最先获得执行时机的地方

方案一

仔细想想方案一其实有很多缺点,在Application解密出源Apk之后,还要手动承担各种组件的启动过程,所以从逻辑上来讲远不如方案二,方案二只需要加一个外壳Application即可,所以这里只实现方案二。

方案二

首先编写一个测试APP,其中加点资源,为了验证正确性

程序有两个Activity,没有指定Application

image-20220612114932341

MainActivity用一个Button启动SecondeActivity

1
2
3
4
5
6
7
8
btn_startSecond = (Button) findViewById(R.id.button);
btn_startSecond.setOnClickListener(new View.OnClickListener() {
@Override
public void onClick(View view) {
Intent intent = new Intent(MainActivity.this,SecondActivity.class);
startActivity(intent);
}
});

在SecondActivity中引用了一个Strings资源

1
2
3
4
5
6
7
8
9
10
11
12
13
14
15
public class SecondActivity extends AppCompatActivity {

private TextView textView;
private String TAG = "testSHell";
@Override
protected void onCreate(Bundle savedInstanceState) {
super.onCreate(savedInstanceState);
setContentView(R.layout.activity_second);
Resources resources = getResources();
String str = resources.getString(R.string.secondText);
Log.d(TAG, "onCreate: " + str);
textView = (TextView) findViewById(R.id.textView);
textView.setText(R.string.secondText);
}
}

编写外壳APK

getDex,获取源Dex,源dex放在assets中,这里是用ZipInputStream 创建this.getApplicationInfo().sourceDir的输入流(apk文件就是zip文件),

1
2
3
4
5
6
7
8
9
10
11
12
13
14
15
16
17
18
19
20
21
22
23
24
25
26
27
28
29
30
31
private byte[] getDex() throws IOException {
ByteArrayOutputStream byteArrayOutputStream = new ByteArrayOutputStream();
ZipInputStream zipInputStream = new ZipInputStream(new BufferedInputStream(new FileInputStream(this.getApplicationInfo().sourceDir)));
while(true){
ZipEntry zipEntry = zipInputStream.getNextEntry();
if(zipEntry == null){
zipInputStream.close();
Log.i(TAG,": not found srcdex");
return null;
}
else if(zipEntry.getName().equals("assets/source.dex")){
Log.i(TAG,"found src dex");
byte[] bytes = new byte[1024];
while(true){
int i = zipInputStream.read(bytes);
if(i != -1){
byteArrayOutputStream.write(bytes,0,i);
}
else{
bytes = byteArrayOutputStream.toByteArray();
Log.i(TAG,"there length is :"+bytes.length);
zipInputStream.closeEntry();
zipInputStream.close();
return bytes;
}


}
}
}
}

读入源dex的字节流之后,得写出来

然后创建Classloader加载释放的源dex,并替换DexClassloader,这里要替换的classloader是前面介绍过的,

1
2
3
4
5
6
7
8
9
10
11
12
13
14
15
16
17
18
19
Object currentActivityThread = RefInvoke.invokeStaticMethod("android.app.ActivityThread",
"currentActivityThread",new Class[]{},new Object[]{});
String packageName = this.getPackageName();
ArrayMap mPackages = (ArrayMap) RefInvoke.getFieldOjbect(
"android.app.ActivityThread", currentActivityThread,
"mPackages");
WeakReference wr = (WeakReference) mPackages.get(packageName);
PathClassLoader dexClassLoader = new PathClassLoader(dexFileName,getClassLoader());
RefInvoke.setFieldOjbect("android.app.LoadedApk", "mClassLoader",
wr.get(), dexClassLoader);
Log.i(TAG,"new DexClassLoader: "+dexClassLoader);
try {
Class clazz1 = dexClassLoader.loadClass("com.zzrr.testshell.MainActivity");
Class clazz2 = dexClassLoader.loadClass("com.zzrr.testshell.SecondActivity");
//Intent intent = new Intent(this,clazz1);
//startActivity(intent);
} catch (ClassNotFoundException e) {
e.printStackTrace();
}

这里要用到一系列的反射操作,所以这里用了一个封装的反射类,这里列出invokeStaticMethod

1
2
3
4
5
6
7
8
9
10
11
12
13
14
15
16
17
18
19
public class RefInvoke {
public static Object invokeStaticMethod(String class_name, String method_name, Class[] pareTyple, Object[] pareVaules){

try {
Class obj_class = Class.forName(class_name);
Method method = obj_class.getMethod(method_name,pareTyple);
return method.invoke(null, pareVaules);

public static Object invokeMethod(String class_name, String method_name, Object obj ,Class[] pareTyple, Object[] pareVaules)

public static Object getFieldOjbect(String class_name,Object obj, String filedName)


public static Object getStaticFieldOjbect(String class_name, String filedName)

public static void setFieldOjbect(String classname, String filedName, Object obj, Object filedVaule)


public static void setStaticOjbect(String class_name, String filedName, Object filedVaule)

手动模拟加壳

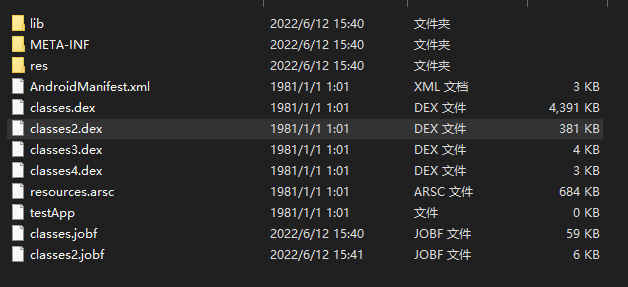
用前文介绍的重打包工具,先unpack testAPP,发现新版AS编译出来的APP会自动分包,实际上分包也没区别,我们只需要把所有的dex都替换成壳的分dex就行,但是这里为了简单就把multiDex关了

image-20220612154158448

在build.gradle里面加上 multiDexEnabled false

1
2
3
4
5
6
7
8
9
10
11
12
13
14
plugins {
id 'com.android.application'
}

android {
compileSdk 32

defaultConfig {
multiDexEnabled false
applicationId "com.zzrr.testshell"
minSdk 21
targetSdk 32
versionCode 1
versionName "1.0"

Android重打包 | zzrR0 (x1aor0.github.io)

因为我们不需要反编译dex,所以要修改下脚本,加个-s参数

1
2
3
4
5
6
7
8
9
10
11
12
13
14
15
16
def unpack_apk(self):
"""
Unpack an APK with apktool.
:return:
"""
click.secho('Unpacking {0}'.format(self.apk_source), dim=True)
o = delegator.run(self.list2cmdline([
self.required_commands['apktool']['location'],
'decode',
'-f',
'-r' if self.skip_resources else '',
'-s',
'-o',
self.apk_temp_directory,
self.apk_source
]), timeout=self.command_run_timeout)

解包之后,把dex拷贝到assets里面,重命名为source.dex,再把壳的dex拷贝进来,然后修改AndroidManifest.xml

image-20220612161614181

添加一个name,标注Application的类,这里apktool重打包可能会报错,需要删除这个属性

android:dataExtractionRules=”@xml/data_extraction_rules”

发现执行都正常,但是还是报错,查看log发现新的Classloader找不到,原来是nativeLibrararyDirectoris里面没加当前App的lib目录

image-20220612171645229

所以在new PathClassLoader要加上lib目录,要得到lib目录可以从原先的classLoader中获取,这里根据官方文档,路径需要用:隔开
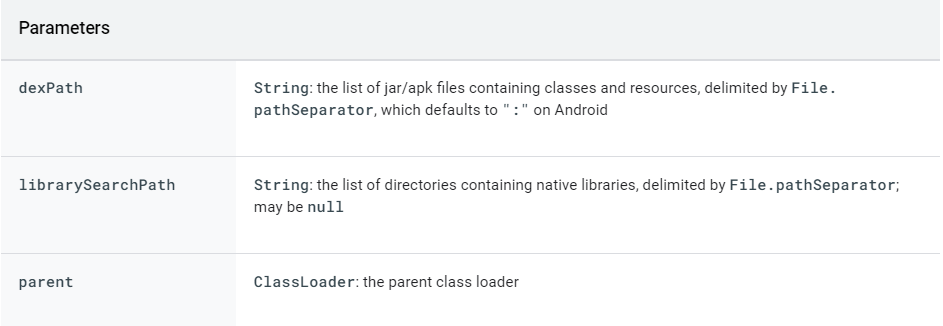
image-20220612174450907

1
2
3
4
5
6
7
8
9
10
private String generateLibPath(){
//File.pathSeparator;
String libPath = getClassLoader().toString();
String[] strs = libPath.split("nativeLibraryDirectories=\\[");
Log.d(TAG,strs[1]);
int index = strs[1].toString().indexOf("]");
Log.d(TAG,strs[1].toString().substring(0,index));
return strs[1].toString().substring(0,index).replace(" ","").replace(",",":");

}

classloder重写如下

1
PathClassLoader dexClassLoader = new PathClassLoader(dexFileName,generateLibPath(),getClassLoader());

加上lib之后,又出现个新错误

image-20220612180836099

这个问题是由于我们的activity继承自AppCompatActivity,继承这个就会出现这个找不到资源的问题,查了很多,发现修改成继承自Activity就能正常找到资源(暂时不了解其原因),因此修改testApp的代码

1
2
public class MainActivity extends Activity {
public class SecondActivity extends Activity {

OK,至此就完成了对testApp的手动加壳了,最终在我的Pixel2的Android7上测试成功

这里在谈谈资源问题,Android是通过资源id和资源的对应关系来加载资源的,我们壳方案下,资源我们没动,用的就是源Apk的资源,所以只要能保证id是对的,就能获取正确的资源,资源id定义在R类中,我们外壳Application是没load这个class的,所以当用到这个类的时候就会走双亲委托机制,这里你可能会有个疑问,按双亲委托机制,我们当前的Classloader也就是外壳的classloader加载的外壳Dex中也有R类,这样加载的R类不就是外壳Dex的吗,然后就会导致id错乱。

仔细想想,其实不是的,R类虽然都叫R类,但是其包名是不同的,

外壳是com.zzrr.zzrshell_out.R

源App是com.zzrr.testshell.R,所以这里是能从源dex中正确加载com.zzrr.testshell.R的。

保护

这里对源dex只是简单放置在assets中,实际加保护的话方案就很多了,就不实现了。

总结

测试App和外壳程序github地址

X1aoR0/zzrAppShell: Study One Generation Shell (github.com)